Table of Contents
This guide is part two of a series. In part one, we explored how to set up NLWeb locally, connect it to Azure AI Search and Azure AI Foundry, and ingest a custom dog breed dataset. In part three, learn how to add new functionality and remote API calls using NLWeb’s custom tools.
Introduction
In this post, we’ll look at abstracting those initial interactions from the out-of-the-box NLWeb chat interface, to a more scalable and secure solution using a .NET proxy for use in real-world websites. This layer is what turns user messages into structured, validated, logged requests that NLWeb can reason over and forward to Azure AI Foundry.
We’ll run through the code in my NLWeb Chat Demo GitHub repository, so clone it and follow along in learning how to implement a .NET proxy.
Architectural Overview
Here’s the architectural mermaid diagram of the demo I’ve put together, which explains from the front-end flow, right through to Azure AI Foundry:
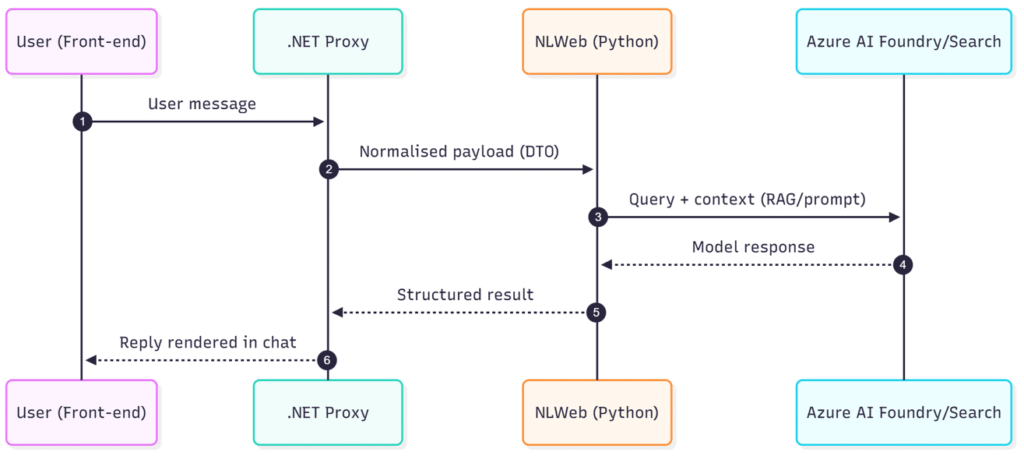
This keeps the front-end clean, isolates NLWeb, and gives us a single place to enforce security, validation, and observability. We’ll look at these areas more closely later.
Why Use a Proxy for NLWeb?
When working with a new and emerging framework like NLWeb, which is open-source and still in its infancy, it’s important to tread carefully to maintain a balance between “trying new stuff” and keeping our software secure. Microsoft hurriedly patched a critical security vulnerability in August 2025, highlighting the importance of shielding the service from the outside world and exposing only what is appropriate to our use case.
Implementing a .NET Proxy for NLWeb
The proxy we’re going to build lives as a .NET 10 Minimal API that terminates HTTPS, normalises and validates requests, and then streams responses from the NLWeb Python runtime back to the browser.
You can find all the below code in my NLWeb Chat Demo GitHub repo.
Prerequisites
You’ll need the following to get up-and-running:
- The .NET 10 SDK installed.
- NLWeb (Python runtime) running locally (the repo targets http://localhost:8000/ as the upstream). See the separate NLWeb and Azure AI Foundry setup guide if you don’t have this already.
1. Create the Web Project
Create a new web project (or skip this step if you’re adding the NLWeb proxy to an existing codebase):
<!-- NLWebChat.Web.csproj -->
<Project Sdk="Microsoft.NET.Sdk.Web">
  <PropertyGroup>
    <TargetFramework>net10.0</TargetFramework>
    <Nullable>enable</Nullable>
    <ImplicitUsings>enable</ImplicitUsings>
    <InvariantGlobalization>true</InvariantGlobalization>
  </PropertyGroup>
</Project>2. Register the Upstream NLWeb Client
In Program.cs, register a named HttpClient that targets your NLWeb runtime:
// Program.cs
// NLWeb upstream client, pointing to your local NLWeb server
builder.Services.AddHttpClient("nlweb", c =>
{
    c.BaseAddress = new Uri("http://localhost:8000/");
    c.Timeout = Timeout.InfiniteTimeSpan;
    c.DefaultRequestHeaders.Accept.Add(new MediaTypeWithQualityHeaderValue("text/event-stream"));
});This block registers a named HttpClient within the ASP.NET Dependency Injection (DI) container using IHttpClientFactory. Having a named client allows us to apply any settings and policies only for NLWeb calls, without affecting other clients we might add later.
If your NLWeb instance is running elsewhere, or on a different port, change the BaseAddress to match your configuration. Better still, remove the hard-coded value to an environment-specific configuration file and fetch like this:
c.BaseAddress = new Uri(builder.Configuration["Nlweb:BaseUrl"]!);You’ll also spot that the Timeout has been set to InfiniteTimeSpan because we’re streaming Server-Sent Events (SSE) from NLWeb. Streaming responses can legitimately last minutes, and a normal timeout would kill the session. By setting it to infinite, you can let the stream run until the user cancels. It’s advisable to implement Cancellation Tokens where available, which I wrote about in a separate post.
Lastly, adding Accept: text/event-stream tells NLWeb upstream that you’re expecting SSEs. Setting it explicitly avoids fallback to JSON or plain text.
3. Minimal Host and Static UI
Still in Program.cs, apply app configuration necessary for the demo:
// Program.cs (cont.)
var app = builder.Build();

// Enforce HTTPS at the edge
app.UseHttpsRedirection();

// Serve index.html by default
app.UseDefaultFiles();

// Static front-end files
app.UseStaticFiles();

// Register endpoint groups for the demo
app.MapNlwebEndpoints();It’s not strictly necessary to enforce HTTPS here, but it is good practice in production environments. For that reason, and because we’ll implement some calls that pass sensitive data in my next post, we’ll make sure to use it.
4. Add the Streaming Proxy Endpoint
The code in Endpoints/NLWebEndpoints.cs is the heart of the proxy. It accepts POST, forwards to NLWeb, and streams bytes back to the client with the right headers:
// Endpoints/NLWebEndpoints.cs
using System.Text;

namespace NLWebChat.Web.Endpoints;

public static class NlwebEndpoints
{
    public static IEndpointRouteBuilder MapNlwebEndpoints(this IEndpointRouteBuilder app)
    {
        var api = app.MapGroup("/api").WithGroupName("nlweb");

        // POST /api/nlweb -> stream upstream
        api.MapPost("/nlweb", async (HttpContext ctx, IHttpClientFactory factory) =>
        {
            var client = factory.CreateClient("nlweb");

            string body;
            using (var reader = new StreamReader(ctx.Request.Body, Encoding.UTF8, detectEncodingFromByteOrderMarks: false, bufferSize: 8192, leaveOpen: true))
            {
                body = await reader.ReadToEndAsync(ctx.RequestAborted);
            }

            using var content = new StringContent(body, Encoding.UTF8, "application/json");
            using var req = new HttpRequestMessage(HttpMethod.Post, "ask") { Content = content };

            using var resp = await client.SendAsync(req, HttpCompletionOption.ResponseHeadersRead, ctx.RequestAborted);

            ctx.Response.StatusCode = (int)resp.StatusCode;
            ctx.Response.ContentType = resp.Content.Headers.ContentType?.ToString() ?? "text/event-stream";
            ctx.Response.Headers.CacheControl = "no-cache, no-transform";
            ctx.Response.Headers["X-Accel-Buffering"] = "no";
            ctx.Response.Headers.Connection = "keep-alive";

            await using var upstream = await resp.Content.ReadAsStreamAsync(ctx.RequestAborted);
            await upstream.CopyToAsync(ctx.Response.Body, 64 * 1024, ctx.RequestAborted);
            await ctx.Response.Body.FlushAsync(ctx.RequestAborted);
        });

        return app;
    }
}There are some notable parts in the code above:
- SSE-friendly headers are set (such as
no-transform,X-Accel-Buffering: no,keep-alive) so proxies and CDNs don’t buffer the stream. That won’t be an issue locally, but could well be in other public-facing environments. CopyToAsyncwith backpressure (in 64KB chunks) means the proxy streams data from NLWeb to the client at the client’s pace, not as fast as the server can produce it. Each chunk is written asynchronously and awaited, so if the browser or network slows down, the proxy automatically pauses reading from the upstream. It prevents memory build-up and keeps the stream smooth.RequestAbortedis respected, meaning connections will terminate if the client exits.
5. Add Input Validation
A big benefit of adding a proxy for user input is being able to validate it consistently and in-line with various policies. I’ve added an example of how to ensure the user’s payload size doesn’t exceed 64KB:
// POST /api/nlweb -> stream upstream
api.MapPost("/nlweb", async (HttpContext ctx, IHttpClientFactory factory) =>
{
	// Validate the body size to prevent abuse (64KB hard cap)
	const int MaxBodyBytes = 64 * 1024;
	if (ctx.Request.ContentLength is long declaredLen && declaredLen > MaxBodyBytes)
	{
		ctx.Response.StatusCode = StatusCodes.Status413PayloadTooLarge;
		await ctx.Response.WriteAsync("Request body too large.", ctx.RequestAborted);
		return;
	}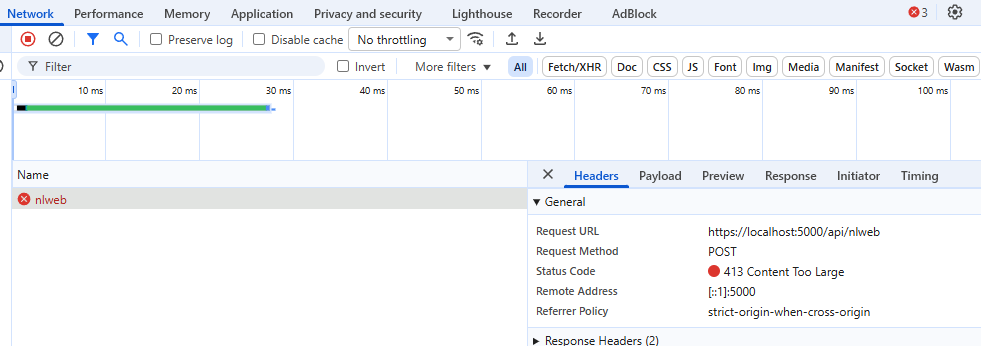
...You can test this yourself by lowering the value to 1KB and submitting a small amount of text to the endpoint, which should fail with a 413 Content Too Large result:
You could consider adding logging or telemetry around this code so that you can measure performance and capture valuable usage data. Producing metrics allows you to better plan and scale in the future.
6. Run the NLWeb Proxy
Now you’ve seen how to implement the NLWeb proxy, let’s run it! Ensure your local NLWeb environment is up and either hit the play button in Visual Studio or type dotnet run in the project’s directory to start the app.
Once it’s running, navigate to https://localhost:5000/ in your browser. You’ll see the default page with the NLWeb proxy chat interface.
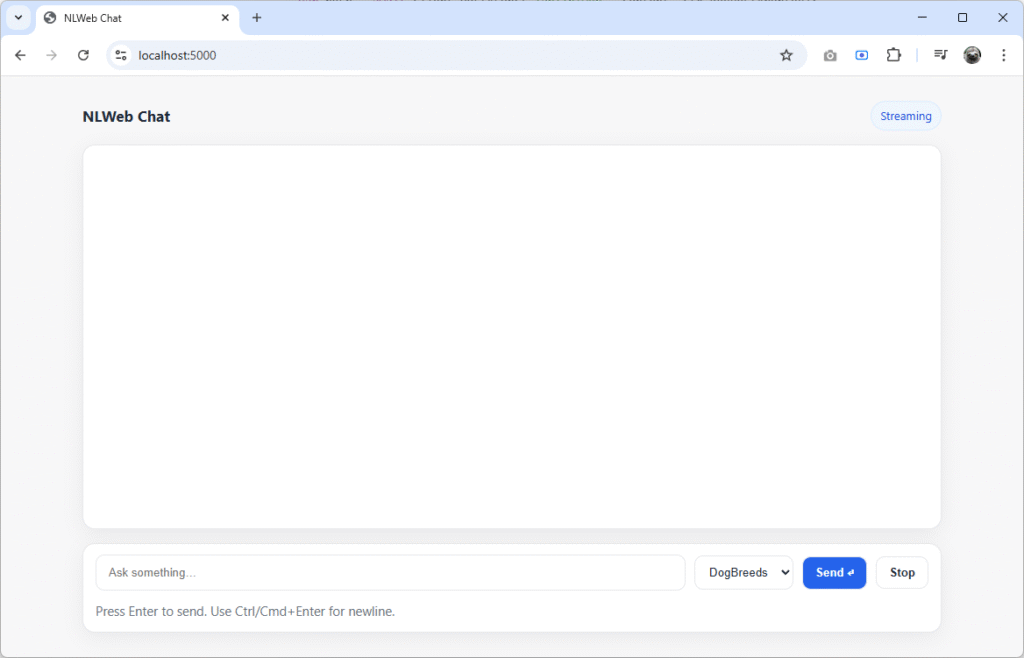
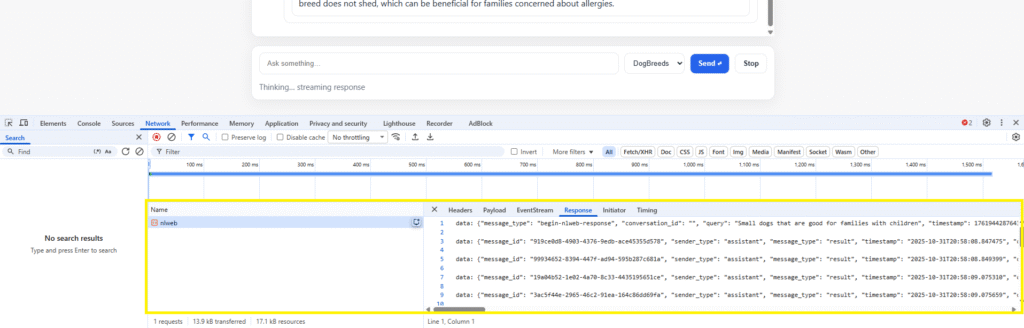
Try it out – type in a query and press enter. The status will indicate “Thinking... streaming response” under the textbox and your browser’s dev tools will show the content stream and the response building up in real time:
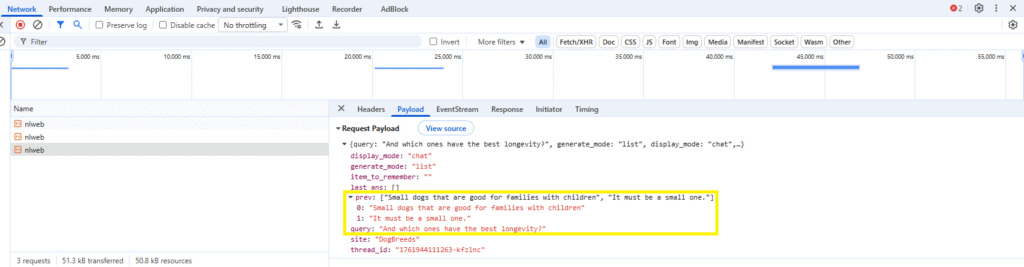
The proxy successfully maintains state across queries, mirroring the behaviour of the interface that comes with NLWeb:
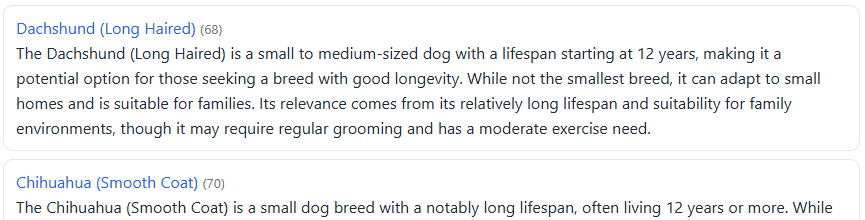
The framework pulls results back that truly reflect what the user intended, across multiple transactions, ensuring we can direct them to the most appropriate content for their needs:
That’s it! You now have a fully-working and extensible NLWeb .NET 10 proxy to use in your own projects.
What the NLWeb Proxy Does
Now we’ve got the NLWeb proxy set up, let’s consider how exactly it’s functioning.
The proxy sits at the heart of this loop and takes the role of traffic controller and security gateway (amongst other things). It ensures that our applications can make use only of the functionality we want to expose, keeping fine-grained control over what the user sees and can and cannot do.
In our case, the proxy:
- Receives user input in the UI over HTTPS.
- Validates input and headers before doing anything else.
- Normalises data formats for downstream consistency.
- Logs (if implemented) for observability and statistics – great for measuring impact.
- Forwards valid payloads to NLWeb’s API endpoint (running in Python).
- Relays responses back to the front-end client in a predictable way.
Let’s unpack that a little bit, because there’s a lot to think about in terms of why we’d want to do all of those things.
Receiving User Input via HTTPS
The out-of-the-box implementation of NLWeb’s chat interface spins up an instance on your localhost environment over an HTTP WebSocket connection. User interactions are unpredictable, and could contain sensitive data, so implementing a secure connection via POST requests over an HTTPS proxy would be prudent, otherwise it’s susceptible to being sniffed by malicious actors when it’s deployed to a production environment.
Validating Input and Headers
NLWeb’s stock chat endpoint will happily accept anything you throw at it: raw text, empty payloads, malformed JSON, and even unexpected headers. That’s fine for experimentation, but in a production setting, you need to guarantee that what enters the pipeline is both syntactically and semantically valid.
The proxy layer gives you this control and has the huge benefit of being written in a language you know well (for me, that’s .NET, though practically you can create a proxy in any capable language you choose). It enforces schema validation, checks authentication headers, and can reject malformed or unauthorised requests before they reach the Python runtime. Without it, you’re trusting arbitrary client input to travel uninspected into your AI environment – a fast way to end up with injection attacks or runtime errors buried in the model’s logic.
Normalising Data Formats
NLWeb doesn’t assume a fixed structure for user input, which is very powerful. But it means downstream systems might receive things like inconsistent casing, locale formats, or date strings.
The proxy can standardise all of this. It’s the perfect place to normalise user identifiers, strip unwanted characters, and map UI-level properties to NLWeb’s expected schema. It makes sure the payload that NLWeb receives is consistent across sessions, clients, and environments – and that’s a critical detail if you’re logging conversations or connecting to external services. In my next post, I’ll show you how to use NLWeb’s tooling to store user contact information via an API.
Without a proxy, that responsibility falls entirely on the front-end, which is both unreliable and insecure.
Logging for Analytics and Debugging
Out of the box, NLWeb doesn’t expose granular telemetry. It focuses on the AI workflow, not on request analytics or latency metrics. That can be a problem in larger organisations in particular, where measuring metrics are part and parcel of the Product team’s roadmap.
A proxy is also the ideal observability point for debugging. You can log incoming payloads, timing data, response codes, and even trace IDs that follow the request through NLWeb to Azure AI Foundry. Those logs become invaluable when diagnosing latency spikes, identifying prompt-related failures, or monitoring usage patterns. A note of caution though: be wary of potentially capturing sensitive data, which may leave you in breach of data protection regulations.
Without a proxy, you’re operating blind to what’s actually happening between the UI and NLWeb – especially once you scale beyond your local machine to platforms like Azure.
Forwarding Valid Payloads
NLWeb runs its Python API locally, typically over HTTP on a loopback address like localhost. It’s not designed to be directly exposed, nor should it be. The proxy acts as a broker, safely forwarding validated requests to NLWeb while keeping that internal port hidden from public access. If you’re using Azure, you can spin up an instance of NLWeb and access it via a private endpoint so that traffic between the user-facing proxy and NLWeb itself stays within your network.
This keeps your runtime compartmentalised: the front-end only knows about the proxy, and the proxy alone is authorised to communicate with NLWeb. It’s also where you can add retry logic, connection pooling, or async streaming support without modifying NLWeb itself.
Without this middle tier, your front-end would need to talk directly to the Python server, exposing internal ports and eliminating any chance of structured error handling or throttling. The cost of Azure AI services alone is enough to ensure you’re managing traffic in a measured way.
Relaying Responses Back to the Client
NLWeb’s responses are flexible, which is great – kind of. They’re sometimes structured, sometimes plain text, depending on what the AI runtime returns. That flexibility is great for experimentation but problematic for UI consistency.
The proxy can wrap NLWeb’s responses into a predictable schema before returning them to the client, ignoring irrelevant frames and enhancing the user experience. This allows your chat interface to display consistent message types, metadata (like tokens, latency, or status), and error messages. You can really make the whole experience better for the user.
And finally, it’s also where you can implement response caching or compression to improve perceived and actual performance. There are big wins here.
Drawbacks of Using a Proxy
It might seem that, given all of the above, there really is no choice than to create a proxy around NLWeb. But in doing so, there are a few points to keep in mind:
| Drawback | Mitigation |
| Extra network hops | Keep both services on the same host or VNet to reduce latency. |
| Serialisation overhead | Use super-lightweight DTOs where possible. |
| Versioning complexity | Update frequently from the NLWeb GitHub repository, tweaking your proxy as needed. |
| Latency under load | Streaming is pretty efficient, but consider WebSockets or similar for long responses. |
Final Thoughts
Building a proxy around NLWeb might feel like adding an extra layer between the UI and the AI runtime, but it’s a necessary step and should always be part of your production architecture.
We’ve seen how a lightweight .NET 10 Minimal API can act as a secure, observable, and scalable bridge between your chat interface and NLWeb’s Python runtime. It terminates HTTPS, validates and normalises data, streams results efficiently with backpressure, and provides a central point for logging and governance. These are all things the out-of-the-box NLWeb experience doesn’t give you – and exactly what you need once you move to production.
The result is a proxy that does more than forward requests: it defines the contract between your application and the AI. It gives you the flexibility to evolve either side independently without breaking your client applications.
[…] connect it to Azure AI Search and Azure AI Foundry, and ingest a custom dog breed dataset. In part two, we’ll create a small-but-powerful NLWeb proxy using .NET […]