Table of Contents
In my previous articles, I showed you how to configure a local instance of NLWeb and connect to Azure AI Search and AI Foundry, as well as how to build a secure streaming proxy in .NET 10.
In this part, we’ll look at how you can take things further by adding custom NLWeb tools. They’re super powerful in extending the capabilities of how the framework can interact seamlessly with both users and other applications and services.
We’ll add three real examples together, focused around the Dog Breeds data from my first post:
- rspca_notice.py – sends an alert to users and stops further model execution via
query_done. - dog_purchase_intent.py – detects purchase intent (e.g., “Where to get Border Terrier puppies”).
- contact_user.py – sends captured details back to a .NET via a real API call.
I’ll cover how the NLWeb tool system works (prompt-score-handler invocation), how to define new tools, and build workflows by detecting intent.
You can find all the code for the examples covered below in my NLWeb Chat Demo GitHub repo. Drop-ins for NLWeb configuration can be found in the NLWebFiles folder.
Understanding NLWeb’s Tool System
NLWeb uses a flexible tool-calling system to evaluate, select, and invoke tools based on a query. The framework reads tools.xml at start-up to discover available tools, control which are enabled, and wire them into the orchestration loop. It’s the manifest that registers and configures custom tools so the runtime can load them and route tool-calls from the conversation to your custom Python handlers. Each entry maps a tool name (the identifier the model will call) to a Python file/class that implements the logic, letting you expose actions like notices, detectors, and API integrations to your chat flow.
Microsoft’s official NLWeb project on GitHub has a default template, which is the default local instances will use when cloning the repo. Take a moment to read about implementing tools in NLWeb’s docs.
Tool Architecture
Here’s a simple flow chart that reproduces from end-to-end what happens in the NLWeb framework when a user sends a query:
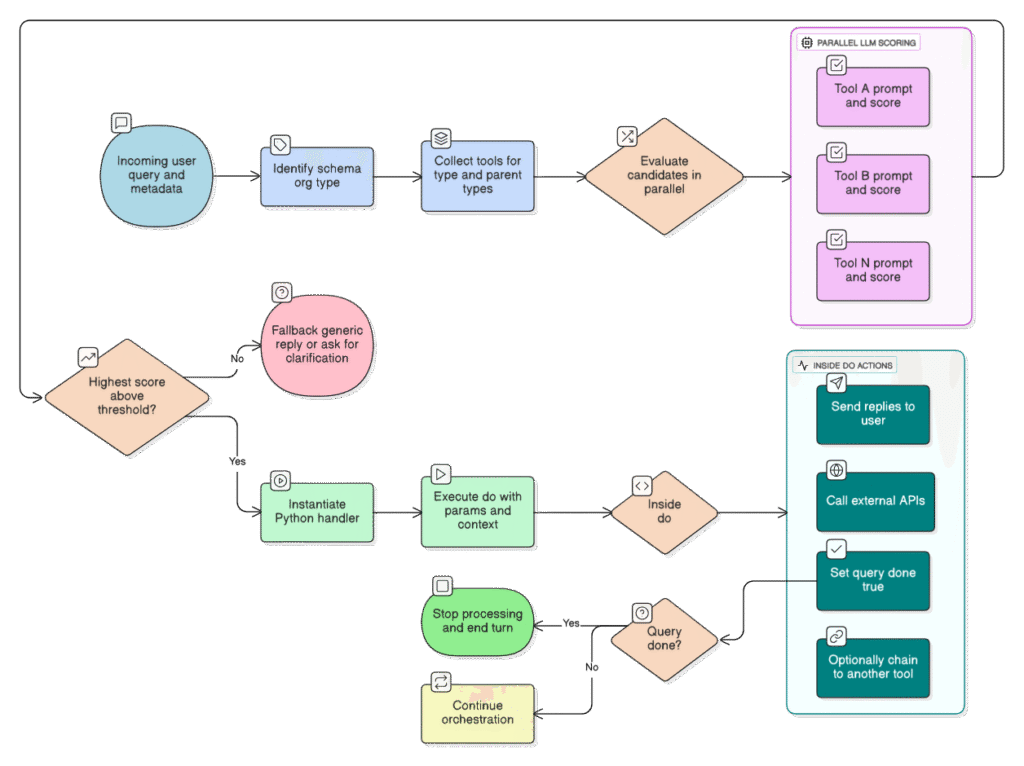
The flow is essentially:
- An incoming user query arrives with metadata (including any schema.org type awareness).
- NLWeb identifies the schema.org type of the query (e.g.,
Thing,Recipe,Movie). - It collects all tools registered under that type (and its parent types).
- In parallel, an LLM evaluates each candidate tool – each has a “prompt” that asks the model to judge whether that tool is relevant. In the response the model outputs a score (integer 0-100) and any extracted parameters.
- The tool with the highest score (above threshold) is selected.
- The handler (Python class) for that tool is instantiated with the extracted parameters and
do()is executed. Withindo()you can send replies, call APIs, setquery_done, call subsequent tools etc.
NLWeb Example Tool Definition
Here’s an example of how a tool is defined inside tools.xml, taken from NLWeb’s official docs/tools.md. Each <Tool> element describes how NLWeb recognises, scores, and executes a specific capability. In the example below, the search tool defines a simple query handler that calls an API endpoint whenever a user asks to “find” something:
<Thing>
  <Tool name="search" enabled="true">
    <path>/api/search</path>
    <method>url</method>
    <handler>core.search.SearchHandler</handler>
    <argument name="query">User's search query</argument>
    <example>Find Italian restaurants near me</example>
    <prompt>
      The user has the following query: {request.query}.
      The search tool finds items that match specific search criteria...
      Assign a score from 0 to 100 for whether the search tool is appropriate.
    </prompt>
    <returnStruc>
      {
        "score": "integer between 0 and 100",
        "search_query": "the search query that should be passed to the tool"
      }
    </returnStruc>
  </Tool>
</Thing>Each tool uses an LLM to determine its applicability, and is then given a score threshold to determine relevancy. The higher the score, the more confident the model is that the tool should be used. Because NLWeb classifies user intent using schema.org types, this scoring isn’t random, but rather it’s guided by structured context-aware metadata that helps the framework match the right tool to the right kind of request.
Adding Custom Tools
NLWeb’s ability to add custom tools is a really powerful feature. It transforms the framework from a simple natural language processor into a truly customisable tool that can add huge value to your new and existing projects. Let’s look at some examples from the demo project that show how to wire Python tools into NLWeb, and how to interact with them in a .NET backend.
1. RSPCA Notice Tool
This first tool (rspca_notice.py) demonstrates the simplest possible pattern: return a message to the user, then stop further model processing. Using the example DogBreeds site in the index, it displays a written notice to any user that expressed concern for an animal, or where RSPCA intervention might be encouraged.
Step 1: Register in NLWeb’s tools.xml
To begin, register the tool in config\tools.xml:
<Tool name="rspca_notice" enabled="true">
  <method>code</method>
  <handler>methods.rspca_notice.RSPCANoticeHandler</handler>

  <example>I think someone is mistreating an animal</example>
  <example>My neighbour's dog is barking all the time and I'm worried about it.</example>
  <example>I found an injured dog on my road.</example>
  <example>Where can I get animal welfare advice?</example>

  <prompt>
	The user has the following query: {request.query}

	Trigger this tool when the user suggests something that might warrant animal welfare intervention, or the user explicitly asks about the RSPCA (case-insensitive).
	Statements such as "someone is mistreating an animal", "found a dog and unsure what to do", "dog welfare advice" - or any other statement which requires expert advice.
	Score 100 if yes, else 0.
  </prompt>

  <returnStruc>{ "score": "integer between 0 and 100" }</returnStruc>
</Tool>Step 2: Create the rspca_notice.py Handler
If the model detects any searches that it thinks conform to my prompt, it will score 100 and the tool’s handler will be invoked. NLWeb will expect to be able to find an available implementation, which in this case is created in code\python\methods\rspca_notice.py:
from misc.logger.logging_config_helper import get_configured_logger

logger = get_configured_logger("rspca_notice")

class RSPCANoticeHandler():
    def __init__(self, params, handler):
        self.params = params
        self.handler = handler

    async def do(self):
        # Set the notice text
        notice_text = (
            'Stop and think! '
            'If you think an animal needs help or is in danger, the best thing to do is get help from the RSPCA. '
            'You can call them on <a href="tel:020 7946 0999">020 7946 0999</a> or find them via their website at '
            '<a href="https://www.rspca.org.uk/" target="_blank">https://www.rspca.org.uk/</a>.'
        )

        # Send message and end the stream
        await self.handler.send_message({
            "message_type": "nlws",
            "answer": notice_text,
            "schema_object": {
                "@context": "https://schema.org",
                "@type": "Message",
                "text": notice_text
            }
        })

        self.handler.query_done = True

logger.info("RSPCANoticeHandler: notice emitted.")Rather than return a set of results following the notice, all further processing is stopped using self.handler.query_done = True. This will mean no further results are displayed underneath and will mark an end in the pipeline.
Step 3: Testing the RSPCA Notice
After making modifications to these files, ensure that you start a fresh instance of NLWeb as the tools.xml file is processed on start-up. Let’s load my NLWeb chat demo project in the browser and enter a sentence that sounds like the user should be referred to the RSPCA for advice.
Performing a search for “How to help stray and hungry dog” produces a match on the prompt for invoking the RSPCA notice handler, and it’s displayed without further processing of results:
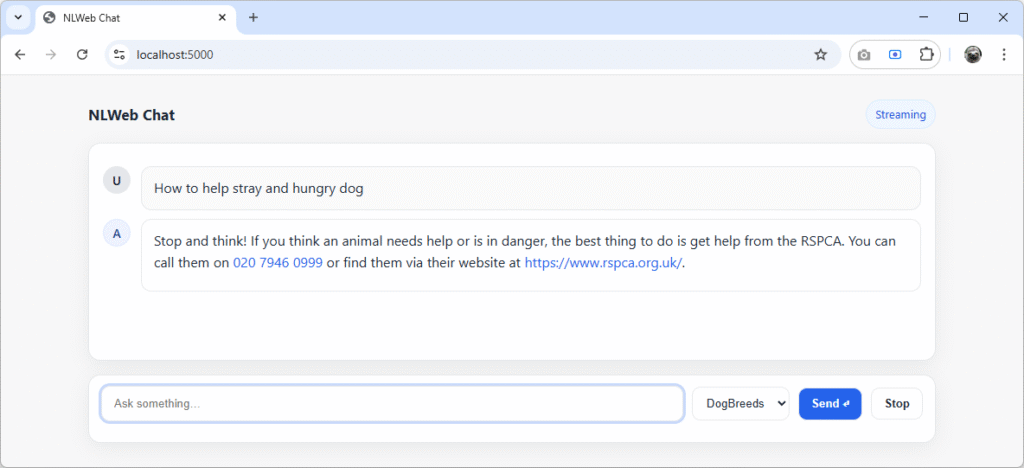
It shows that the meaning of the prompt has been understood of the user’s query. Query processing has also been stopped by the use of query_done = True, which is exactly what we wanted.
Take another look at the prompt above – it nowhere specifies “stray” or “hungry” dogs. Not only is NLWeb able to understand the semantics of what’s being said (through the model’s use of vector embeddings in the index), but it’s able to act and run some custom Python script that we’ve written. It’s a simple but powerful demonstration of how NLWeb can execute real actions, not just return results.
With message-based tools working, we can now move into multi-step interactions, where NLWeb responds intelligently to user intent.
2. Detecting Intent and Collecting Details (“I want to buy a dog!”)
Aside from displaying custom messages to users, what about real world scenarios where we want to extend NLWeb to take tangible action based on user interactions?
The next two tools work together as a chain: dog_purchase_intent.py detects that a user is thinking of buying a dog (essentially a “lead” in sales terms), and contact_user.py collects their details for follow-up, submitting them to an API written in .NET 10, which will store them in an in-memory ConcurrentQueue collection for the purposes of this demo. More on that later.
Step 1: Tool Configuration
The pair of tools are defined in config\tools.xml like this:
<Tool name="dog_purchase_intent" enabled="true">
	<method>code</method>
	<handler>methods.dog_purchase_intent.DogPurchaseIntentHandler</handler>

	<example>I might get a Collie</example>
	<example>I'm thinking of buying a Cavachon.</example>
	<example>Considering buying a dog soon</example>
	<example>Where can I find puppies for sale?</example>

	<prompt>
		The user query is: {request.query}
		Previous user queries (if any): {request.prev}
		Last answer summary or titles (if any): {request.last_ans}

		Trigger this tool if and only if the user expresses intent to acquire a dog/puppy
		(e.g., "buy", "get", "adopt", "rehome", "looking for puppies", "purchase").
		Vague statements like "I would love one of those" only count if the prior context
		(prev or last_ans) clearly refers to a dog/breed.

		Do NOT trigger for general breed info, training, care, or ownership questions without acquisition intent.
		Do NOT trigger if the user indicates they already own the dog (e.g., "I bought a Collie last week").
		Always return 0 if the previous user message included contact details.

		Return 100 if the acquisition intent is present (and prior-contact rule does not apply), else 0.
	</prompt>

	<returnStruc>{ "score": "integer between 0 and 100" }</returnStruc>
</Tool>

<Tool name="contact_user" enabled="true">
	<method>code</method>
	<handler>methods.contact_user.ContactUserHandler</handler>

	<example>example@example.com</example>
	<example>John 07899 837790</example>
	<example>My name is Joe and you can call on 07988 309201</example>
	<example>Dial 0207 8837720 and ask for Lizzie</example>
	<example>Email me, please - Nora nora@thisandthat.com</example>

	<prompt>
		The user has the following query: {request.query}

		Triggers ONLY when a user includes a name and a contact preference (phone number or email address).
		Score 100 if the latest message contains a phone number OR an email address, else 0.
		Additionally, extract the user's name if present.
	</prompt>

	<returnStruc>
		{
		"score": "integer between 0 and 100",
		"user_name": "extracted personal name or use Unknown as a default",
		"user_phone": "extracted contact phone number or empty string",
		"user_email": "extracted contact email address or empty string"
		}
	</returnStruc>
</Tool>Step 2: Detect Intent
We only want to collect user details for someone who has expressed an interest (explicitly or otherwise) that they want to acquire a dog. Examples have been given in the quite lengthy prompt so that the model can better understand when to trigger the tool, with phrases including “buy”, “get”, and “adopt”.
Once intent has been recognised, the dog_purchase_intent.py handler is run, which displays a message to the user. This is almost identical to the RSPCA notice tool we looked at earlier, the only difference being the refinement and length of the prompt in tools.xml that causes its invocation. The more specific your instructions to the mode, the better it will be at assessing when to perform your chosen actions.
With determining purchase intent, a lot of time was spent ensuring the language used had a high success rate in testing with sample queries. There’s inevitably a little bit of trial and error here and writing prompts is not something that an LLM can do for you. Unless, of course, you successfully tell it exactly what you want – in which case you may have written it yourself in the first place.
For reference, here’s what the dog_purchase_intent.py handler looks like:
from misc.logger.logging_config_helper import get_configured_logger

logger = get_configured_logger("dog_purchase_intent")

class DogPurchaseIntentHandler():
    def __init__(self, params: Dict[str, Any], handler):
        self.params = params or {}
        self.handler = handler

    async def do(self):
        # Set the notice text
        notice_text = (
            'It sounds like you might be interested in getting a puppy. '
            'You can browse available litters and responsible breeders on the '
            '<a href="https://www.thekennelclub.org.uk/search/find-a-puppy/" target="_blank">'
            'Kennel Club puppy finder</a>. '
            'If you would like one of our team to call you back for a chat about finding your perfect dog, '
            'send us your name and number in the chat and we will pop you on the list for a call back.'
        )

        # Send message and end the stream
        await self.handler.send_message({
            "message_type": "nlws",
            "answer": notice_text,
            "schema_object": {
                "@context": "https://schema.org",
                "@type": "Message",
                "text": notice_text
            }
        })

        logger.info("DogPurchaseIntentHandler: intent detected; sent puppy link and terminated.")

        # Mark query as done to prevent further processing
        self.handler.query_done = True

returnLet’s open up the chat page of the demo project again. Here, a initial search has been performed for “Labrador” and followed up with “Where to buy a Labrador puppy”, which states in no uncertain terms that the user is considering a purchase:
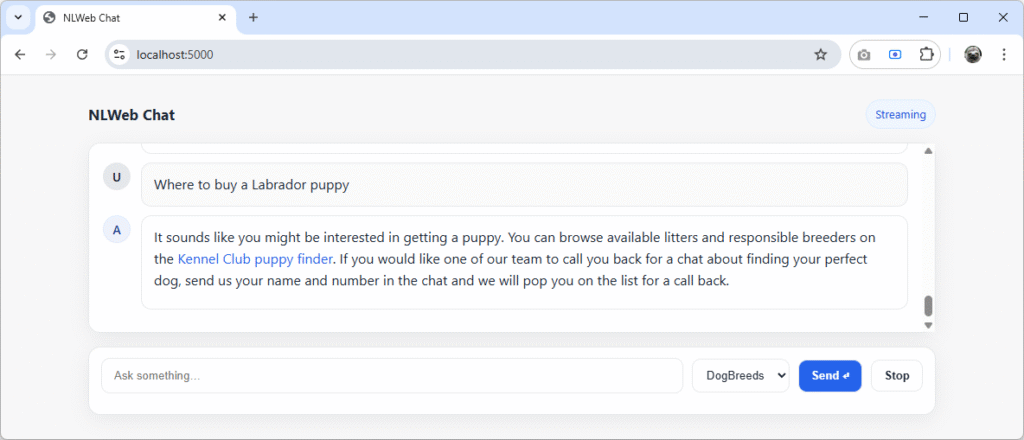
The purchase intent message has been successfully displayed. But what about more vague queries like “How to pay for new Chihuahua puppy”?
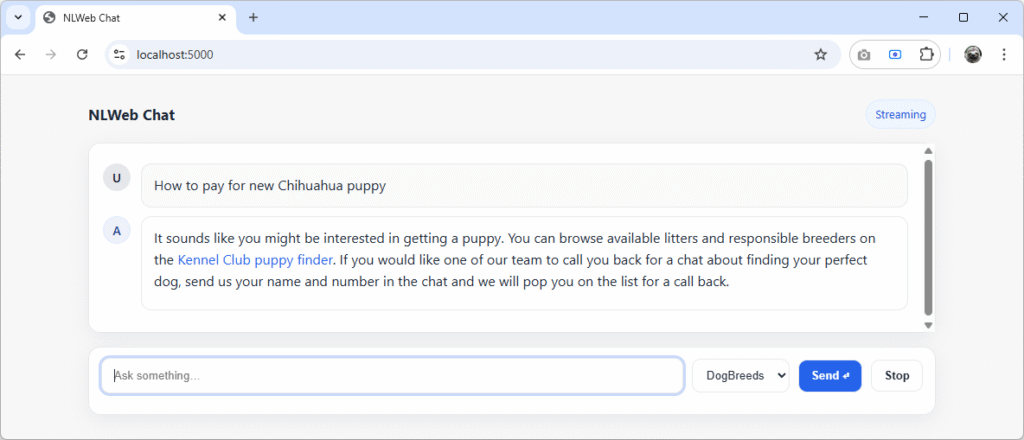
Again, NLWeb still calls the tool, even though the user has only asked about how they pay for a new puppy, rather than saying they want to buy one. Even asking about first vaccinations, the notice shows:

The wording of the prompt can be tweaked to make the semantics around what triggers it more or less aggressive. This is just an example, but in the real world you might not want to display a message to a user at all. Functionality around processing semantic interactions could have numerous uses, including:
- Supermarkets quietly logging searches for types of product ahead of the Christmas season.
- Product teams determining where to focus their efforts on in-demand content creation.
- Charities like The Samaritans detecting when users may need more support – when most people don’t simply say “I need help”.
The possibilities are endless, however big or small the organisations making use of natural language processing tools like NLWeb.
Step 3: Collect Contact Data
The second Python handler script (contact_user.py) is designed to recognise when a user has entered their name and contact method, whether that be an email or a phone number. The prompt in the tools.xml configuration above instructs the framework to run only when these are present:
<prompt>
	The user has the following query: {request.query}

	Triggers ONLY when a user includes a name and a contact preference (phone number or email address).
	Score 100 if the latest message contains a phone number OR an email address, else 0.
	Additionally, extract the user's name if present.
</prompt>Once the model is satisfied the conditions are met, it will pass the extracted values from the user’s input to the handler using the <returnStruct>:
<returnStruc>
	{
	"score": "integer between 0 and 100",
	"user_name": "extracted personal name or use Unknown as a default",
	"user_phone": "extracted contact phone number or empty string",
	"user_email": "extracted contact email address or empty string"
	}
</returnStruc>These variables are referenced at the top of the contact_user.py handler itself in its initialisation so that we can use them in the body and send them via an API call to the demo .NET API:
import httpx
from misc.logger.logging_config_helper import get_configured_logger

logger = get_configured_logger("contact_user")


class ContactUserHandler:
    def __init__(self, params, handler):
        self.handler = handler
        self.params = params
        self.user_name = params.get("user_name", "")
        self.user_phone = params.get("user_phone", "")
        self.user_email = params.get("user_email", "")
self.prev_queries = [str(q).strip('"') for q in (getattr(self.handler, "prev_queries", []) or [])]The variable prev_queries has also been added, which contains all previous user queries from the chat session. This will give context to the contact request when received at the other end, so that a record is stored as to why the user completed the flow.
Lastly, the handler makes a call to the .NET API in the demo project (enabled by import httpx), which is running separately on https://localhost:5000. If the contact request is successful and details are submitted, the user is notified with the message “Thanks for your details – we’ll be in touch!”:
    async def do(self):
        # Build the JSON body to match CreateContactDto(Name, Contact, string[] MessageHistory)
        payload = {
            "Name": self.user_name,
            "Phone": self.user_phone,
            "Email": self.user_email,
            "MessageHistory": self.prev_queries
        }

        # Prefer HTTP locally to avoid cert issues; use verify=False below if using https
        api_url = "https://localhost:5000/api/contacts"

        try:
            async with httpx.AsyncClient(timeout=10.0, verify=False) as client:
                resp = await client.post(
                    api_url,
                    json=payload,
                    headers={"Accept": "application/json"}
                )
                # Raise if not 2xx/3xx; Created should be 201
                resp.raise_for_status()
                logger.info(f"POST {api_url} -> {resp.status_code} {resp.text}")
        except Exception as ex:
            logger.exception(f"Failed calling contacts API: {ex}")

        notice_text = "Thanks for your details - we'll be in touch!"
        await self.handler.send_message({
            "message_type": "nlws",
            "answer": notice_text,
            "schema_object": {"@context": "https://schema.org", "@type": "Message", "text": notice_text}
        })

    async def _send_no_results_message(self):
        await self.handler.send_message({
            "message_type": "no_results",
            "message": "Could not save user details for contact request."
})That should give us everything we need to submit the user’s details to the api/contacts endpoint, where it will be received and stored in the ConcurrentQueue singleton, mentioned earlier.
Here’s what happens when following up with queries containing a buying intent, having then provided some free text with my contact details:
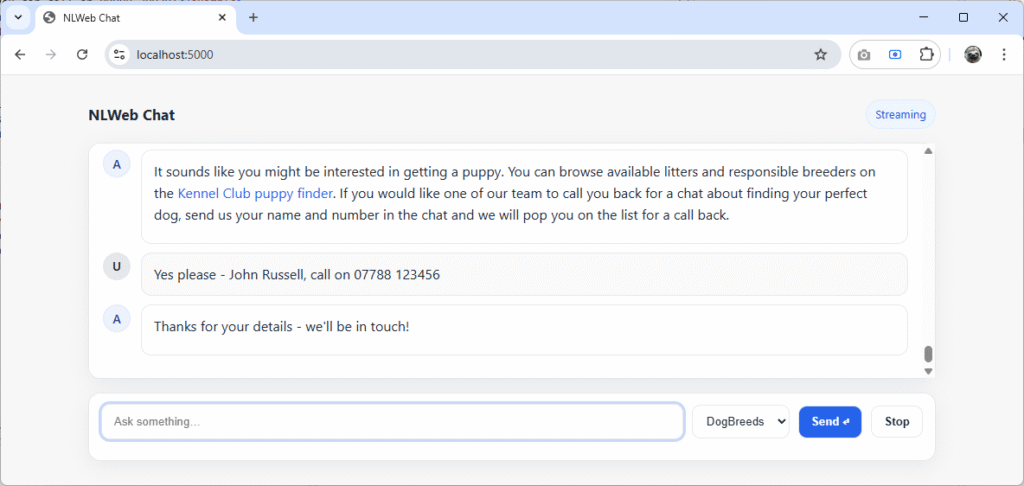
NLWeb has run the contact_user.py handler, and displayed the notification that someone will be in touch, which is just what was instructed. Everything so far has executed within NLWeb’s Python layer. Let’s now see how that bridges directly into .NET.
3. The .NET 10 Integration
The .NET app exposes an API endpoint for the contact_user.py Python tool to call. It keeps things simple: a POST to create contacts and a GET to list them. Data is held in-memory for the demo, and the static contacts.html page renders the results.
Available Endpoints
Two endpoints are exposed via /api/contacts:
- POST
/api/contacts– acceptsName,Email,Phone, andMessageHistoryfound inModels/CreateContactDto.cs. - GET
/api/contacts– returns the in-memory collection so the page (or a load in the browser) can display what was captured. - DELETE
/api/contacts– clears the in-memory collection of data.
Both are registered using app.MapContactEndpoints() in the Program.cs. Here’s what’s contained in the Endpoints/ContactEndpoints.cs:
using System.Collections.Concurrent;
using NLWebChat.Web.Helpers;
using NLWebChat.Web.Models;

namespace NLWebChat.Web.Endpoints;

public static class ContactEndpoints
{
    public static IEndpointRouteBuilder MapContactEndpoints(this IEndpointRouteBuilder app)
    {
        var api = app.MapGroup("/api").WithGroupName("contacts");

        // GET /api/contacts
        api.MapGet("/contacts", (ConcurrentQueue<ContactRequest> store) =>
        {
            var data = store.ToArray().OrderBy(c => c.CreatedAt).ToArray();
            return Results.Ok(data);
        });

        // POST /api/contacts
        api.MapPost("/contacts", (CreateContactDto dto, ConcurrentQueue<ContactRequest> store) =>
        {
            if (string.IsNullOrWhiteSpace(dto.Name)
            || (string.IsNullOrWhiteSpace(dto.Email)
            && string.IsNullOrWhiteSpace(dto.Phone)))
                return Results.BadRequest(new { error = "Name and contact method are required."});

            var item = new ContactRequest(
                Name: dto.Name.Trim(),
                Phone: PhoneNormaliser.NormaliseUkNumber(dto.Phone),
                Email: EmailNormaliser.NormaliseEmail(dto.Email),
                MessageHistory: dto.MessageHistory ?? Array.Empty<string>(),
                CreatedAt: DateTimeOffset.UtcNow
            );

            store.Enqueue(item);
            return Results.Created("/api/contacts", item);
        });

        // DELETE /api/contacts (clear all)
        api.MapDelete("/contacts", (ConcurrentQueue<ContactRequest> store) =>
        {
            var removed = store.Count;
            store.Clear();
            return Results.Ok(new { removed });
        });

        return app;
    }
}The POST request matches the data provided in the payload of the contact_user.py handler:
payload = {
	"Name": self.user_name,
	"Phone": self.user_phone,
	"Email": self.user_email,
	"MessageHistory": self.prev_queries
}Basic validation ensures that a record will only be accepted where it contains a name, and either an email or a phone number. A 400 Bad Request will feed back to the tool if it’s missing data, which in turn can be relayed back to the client in whichever friendly way you choose.
Static Viewer Page
For quick verification the app serves a tiny viewer at /contact.html, which loads in the JSON from /api/contacts and renders them in a simple table. It also hooks into the DELETE request to clear data from the in-memory collection:
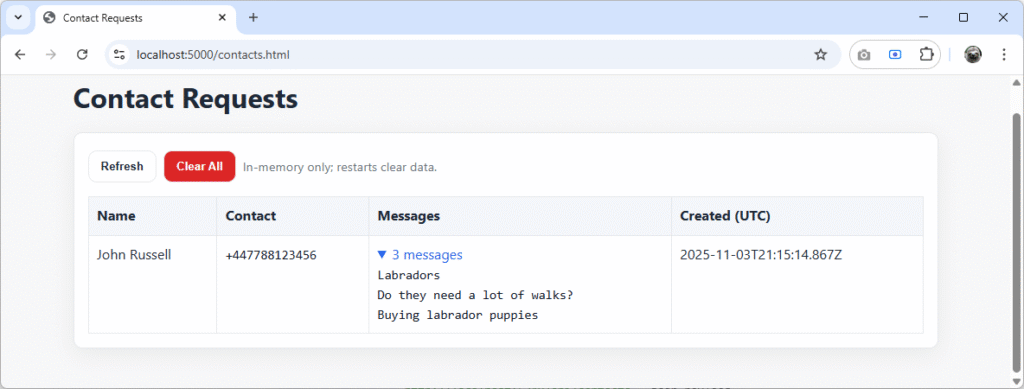
Above, a conversation was created about Labradors, showing some buying intent – which resulted in the details provided (name and phone number) being collected. And for completeness, another session followed the flow using ‘Jane Doe’ – this time providing a name an email address:
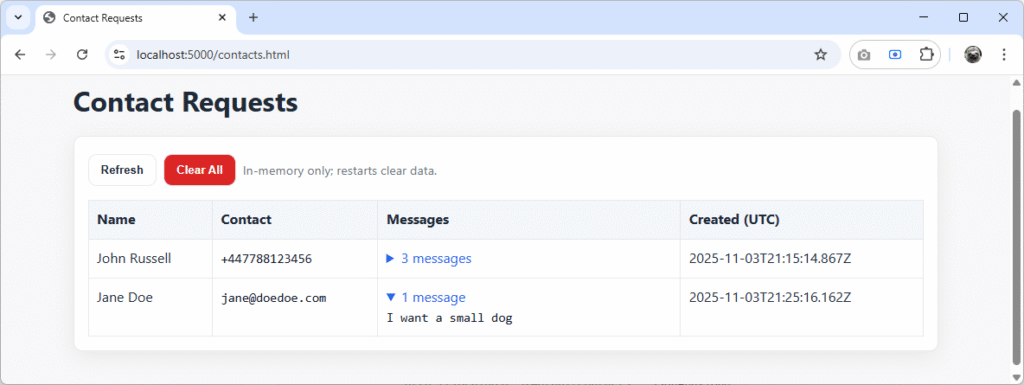
You’ll see new requests on this page every time NLWeb’s Python handler calls the endpoint successfully.
Data Normalisation
To ensure the data entering the destination .NET app is controlled, normalisers were added for both phone numbers and email addresses. They’re not perfect, but serve as an example to show how important normalising data is when passing between various systems.
The main idea here is simple: never trust user input, especially when it might come from multiple frontends, environments, or even automated AI toolchains like NLWeb. Before anything reaches the storage layer, it’s trimmed, lowercased (for emails), and formatted into a consistent structure that the downstream code can rely on.
Email Normalisation
The email normaliser is intentionally minimal. It trims away any extra brackets or quotes that might appear if a user types something like jane.doe@Example.COM and lowercases everything to avoid duplicate entries caused by case variations. It can be found in Helpers/EmailNormaliser.cs:
namespace NLWebChat.Web.Helpers
{
    public static class EmailNormaliser
    {
        public static string NormaliseEmail(string? email, bool removeGmailTags = false)
        {
            if (string.IsNullOrWhiteSpace(email))
                return string.Empty;

            // Trim and strip brackets/quotes
            var e = email.Trim().Trim('<', '>', '"', '\'');

            // Lowercase for consistency
            e = e.ToLowerInvariant();

            // Basic sanity check - if no @, return as-is
            var atIndex = e.IndexOf('@');
            if (atIndex <= 0 || atIndex == e.Length - 1)
                return e;

            var local = e[..atIndex];
            var domain = e[(atIndex + 1)..];

            return $"{local}@{domain}";
        }
    }
}There’s no heavy regex here, or intricate domain validation (though you could add it yourself). The goal is to produce stable, repeatable data for importing into other systems.
Phone Number Normalisation
Phone numbers are far messier and are subject to many permutations. Users type them with spaces, brackets, extensions, and even country codes in multiple formats. The normaliser attempts to convert any UK-style number into E.164 format (+44…) while preserving extensions where possible (trimmed for brevity):
using System.Text.RegularExpressions;

namespace NLWebChat.Web.Helpers
{
    public static class PhoneNormaliser
    {
        // Minimal UK normaliser → E.164 (+44...) with extension preservation
        public static string NormaliseUkNumber(string? tel)
        {
            if (string.IsNullOrWhiteSpace(tel)) return string.Empty;
            tel = tel.Trim();

            ...

            if (string.IsNullOrEmpty(normalised))
                normalised = main; // fallback to original main part

            return ext is { Length: > 0 } ? $"{normalised} ext {ext}" : normalised;
        }
    }
}In the full PhoneNormaliser.cs in the demo project, it also handles emergency codes (999, 112, 101) and international prefixes cleanly, returning them as-is rather than breaking valid numbers from outside the UK. Anything that can’t be parsed falls back to the original string rather than silently failing.
Is Data Normalisation Necessary?
Critically, yes. Normalisation and sanitisation of data is really about predictability, and enables many downstream processes such as:
- Deduplication of users
- Comparison of data (think Unix-based case-sensitivity)
- Integrations with other systems and APIs that have strict format expectations
In larger organisations, data contracts will often be universally defined and applied across all systems. But elsewhere the quality of data schemas and validation is often weaker, which can lead to problems where different models of implementation exist.
Final Thoughts
What I’ve run through here is just a small piece of what NLWeb can do. By adding a few lines of Python and a couple of lightweight endpoints in .NET, we’ve bridged natural-language intent with real, tangible system behaviour. Think about how this could scale across organisations to intelligently join up the user experience. The benefits for both businesses and customers are huge.
It’s worth experimenting with your own tools to extend NLWeb, especially ones that connect into your existing services or datasets. You’ll quickly find that even the smallest Python handler can create huge leverage when it speaks the same language as your .NET app.